Having completed thousands of Bike Fits I can attest to the fact that a large percentage of cyclists lean towards sexy looking bikes and components and then, when they experience back, neck, hands, feet, etc. pain they make an appointment with me for a bike fit expecting a miracle solution that will accept outrageously unfit bikes and components. My question to them is often “do you want sexy or comfortable?”. They often have to choose only one. Let’s review the 3 most common challenges your bike fitter faces:

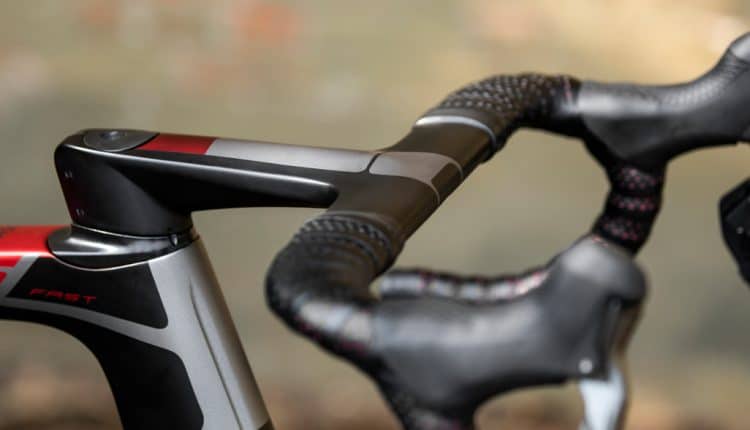
#1 Handlebar/Stem: Integrated handlebar/stem that is too low, too long and/or incorrectly shaped hand holds.

Solution: BEFORE choosing your steed and components have your ‘biomechanically correct’ Reach and Stack numbers in hand – do not exceed these parameters i.e. for Reach you can adjust stems by +/- 10mm for most integrated stems (but expect to pay dearly for a new set of bars) and for Stack you cannot go lower or higher than the limitations of the fork setup e.g. 2022 Specialized Roubaix ‘Future Stem’ has very little room for adjustment, etc. and finally for shape be prepared for the ‘claw grip’ for handlebars that are not traditionally and comfortably ’round’.

#2 Saddle: Listen up people “The saddle that comes on your new bike. with very few exceptions, WILL NOT WORK FOR YOU”. It is nearly impossible that you will be the lucky person that fits the exact shape, width, length and firmness saddle included in the original build. Pressure, especially pressure that causes numbness of soft tissue areas, often leads to seriously damaging personal area health challenges including sexual disfunction, prostate issues and saddle sores.

Solution: Set aside and extra $200 budget to find your perfect saddle NOTE: “Perfect Saddle” is the one that has little or no pressure on soft tissue areas and you forget about after 10-15 min of riding.

#3 Morton’s neuroma aka Numb or Hot feet: Ignore foot numbness and/or hotfoot at your peril. This often leads to many years of treatment by podiatrists – and often to permanent injury.

Solution: Proper fitting cycling shoes. A bicycle shoe should feel the same as a comfortable pair of regular shoes – mine feel like sneakers. When looking for shoes to solve foot issues the most important measurements are length AND WIDTH. There are very few cycling shoe manufacturers who serve the more than 50% cycling population that need shoes that are EEE wide. I have thousands of shoe sizing measurements and it is glaringly obvious that more than half of the customers I see have shoes that are too narrow – sexy looking yes, but too narrow. We are distributer of Lake Shoes who are one of the VERY FEW manufacturers whose EEE are truly wide shoes. SIDI Mega offer a wide (EE width) and Shimano and Specialized are ‘E wide’.

In summary – see your bike fitter or LBS with ‘shop fitter’ experience BEFORE choosing your new bike. As a bike fitter I expect to be able to provide a solution where you can ride comfortably for 3-5 hours. it is very difficult and sometime impossible to achieve that goal when you choose “Sexy over Comfortable”

Cramps are strong involuntary muscle contractions. They can occur at any time though they are most common during or shortly after hard exercise. They can occur in any muscle, though in cyclists they are most common in the quads, hamstrings and calves. They can be so strong that they cause you to launch out of a chair or actually pull a muscle.

There are a myriad of anecdotal and homeopathic ‘recipes’ for preventing cramps including pickle juice, quinine, etc. but before you reach for grandma’s solution I suggest you 1st review the scientifically proven causes of cramps – on a fundamental level they are all the same. When you move, your brain sends signals to your muscles requesting a contraction. The central nervous system receives feedback on the strength of the contraction that has occurred, from which it can make fine adjustments so that you can make a controlled movement. If the feedback says that the contraction is harder than expected, the brain can send instructions to contract less. If the feedback says the contraction is weak, the brain can send a signal to contract more. As a muscle fatigues, the brain sends more signals to tell the muscle to contract to get the same strength of contraction. When the muscle becomes too fatigued to do what is asked of it, the brain sends a continuous contraction signal, which initiates a cramp.

Causes of cramps and how to correct themAnything that fatigues a muscle can bring on a cramp, and anything that keeps a muscle fresh helps prevent cramps. Talk to your coach about which of the following might contribute to your particular problem and how to train to prevent or resolve;

  • Inadequate training: You may cramp towards the end of a long or hard ride simply because you have not trained adequately for the distance or the intensity of your ride. Make gradual increases to volume and intensity.
  • Pushing a big gear: One clue that you may be doing this is if you find yourself standing each time you need to accelerate. Another clue is measuring your cadence below 85 rpm for much of a hard ride. The cure? Switch to a lower gear. Spin to save your legs. Get a larger rear cog or a triple crankset if necessary.
  • Dehydration: Muscles don’t contract well if they don’t contain their normal amount of water. Stay hydrated.
  • Fuel: Muscles can’t contract if they don’t have a good supply of glucose. Keep eating carbohydrate rich foods on longer rides. Eat something at the start of the ride, after about 30-40 minutes and every 15-20 minutes thereafter. Aim for about 300 calories per hour if you are under 150 pounds and 350 if you are over 150 pounds.
  • Electrolyte balance: Muscles will cramp if they don’t contain their normal amounts of sodium, potassium, calcium and magnesium. Those amounts change during exercise. Salt your food and eat plenty of bananas. If you don’t eat a lot of dairy, take a calcium supplement or eat plenty of brassica veggies (collards, kale, cabbage, broccoli, Brussels sprouts and cauliflower). Calcium based antacids such as Tums have cured many cases of cramps. Take one before riding and one each hour of the ride if you have been having cramps. Don’t wait for the cramp to take the calcium. Some green vegetables eaten raw, particularly spinach, will leach calcium from your system. Avoid excessive amounts of raw spinach.
  • Creatine Monohydrate supplementation: In some people creatine supplementation (especially loading) may cause cramps, especially if the athlete is at all dehydrated. If in doubt, avoid this supplement.
  • Tight muscles: Regular stretching of muscles that tend to cramp can reduce the cramping.
  • Impaired circulation: Muscles that are not receiving a good blood supply are deprived of oxygen and fuel. They will not recover from one contraction to the next and so will fatigue quickly. Do what you can to correct pressure points on the saddle, in your shoes, in your shorts and anywhere else they might interfere with circulation.
  • Heat or cold: On hot or cold days some people will cramp even if they do everything else right. On hot days, do what you can to keep cool. As well as staying hydrated, dribble water on your jersey and shorts and through your helmet every once in a while. Chose shadier and flatter routes on hot days, unless you are racing and don’t have a choice. On cold days, dress warmly.
  • Bike Fit: A poorly fit bike may cause some muscles to work harder than necessary, bringing on a cramp. If in doubt, have your coach check your fit.
  • Rhabdomyolysis: If cramps are followed shortly by red or brown urine, you may be experiencing a breakdown of muscle tissue with release of muscle contents into the blood. This is a medical problem that needs immediate professional attention to prevent kidney damage. Treatment for acute rhabdomyolysis is high volume IV rehydration.
All information in this program remains the intellectual property of P. Dave Jordaan. 
Unauthorized use prohibited. Copyright and Distribution protected. © CyberCycleCoach 2006.


A cycling race tactic is a specific plan by a single or group of riders in support of a particular strategy. The strategy is the overall game plan and the tactics are the many little movements it takes during the game to achieve the goals of your strategy. Plan A is to have a pre-race strategy. Plan B is to make Plan A work! All racing tactics can be categorized as follows;

  • POSITIVE (work done for team or individual goal – effort placed on advancing pace/ group)
  • NEUTRAL (Holding your place but neither advancing nor blocking the outcome)
  • NEGATIVE (Working against or attempting to undermine efforts of other teams or individuals – reacting to other riders moves and therefore works against your result)

The “BIG 5” race tactics: ATTACKING, BLOCKING, CHASING, BRIDGING and SPRINTING. I will send you specific sheets on these but 1st and foremost you need to fully understand the following;

Fundamental tactics that apply to every race:

  • Always remember what the overall planned strategy is. You can change tactics as long as it does not affect the strategy.
  • Never go to a race to lose unless either you or your team cannot physically support any kind of winning action – when you would then race to place (even if it is a ‘training’ race’)
  • Never chase your own teammate.
  • Never do your competition’s work for them
  • Never underestimate your competition’s strength.
  • Always try to toughen every race you enter.
  • Every ounce of energy you expend must be to your own or your teams’ benefit.
  • Racing aggressively is your best weapon.
  • No matter how hard you are hurting do not let anyone know i.e. look relaxed and SMILE

Fundamental facts that apply to every race are;

1)      If you are not 30% stronger than the rider or group on your wheel then you should not be ahead of that rider or group unless you have a special purpose for pulling at that point.

2)      Only 30% of a peleton, usually only the riders in the front 10 to 15, are a major factor during a bicycle race. The rest of the riders are

  • Sitting in to save it for the finish.
  • Barely strong enough to hold on at the back.
  • Injured or sick and are trying to recover.

These 3 groups of riders are most often the causes of crashes so if you want to increase your safety make certain that you ride in the front 1/3rd while at the same time staying off the front (unless you have a really good reason to be up there).

3)      A break must have at least one team rider in it or it will almost certainly come back

4)      The peleton will often lose focus on a break which is more than;

  • Women’s Cat 3/4, Juniors and Cat 4/5:     20 to 25 seconds ahead
  • Men’s Cat 3 Women’s Cat 1/2:                 30 to 40 seconds ahead
  • Men’s Cat 1/2:                                          50-60 seconds ahead
  • Pros:                                                          Never

Learn to judge these times i.e. how long your lead has to be in order to stay away in a break

CyberCycleCoach is based in sunny Southern California so rain is never a huge deterrent to riding our bikes as it is typically a pleasant 60+ degrees when the clouds are low. However some of our athletes live in less friendly climates where wet is also typically cold @ 42º. Here is a complete list of rain day ride rules that we recommend;

Dress appropriately: The goal is to keep the elements out and your body temperature stable – DO NOT OVERDRESS. Wear just enough to be slightly cold when you start pedaling. The first few minutes may be chilly, but your body produces a vast amount of heat so you will warm up quickly – layers;

  • Base Layer: Next to your skin keeps you dry and stops you getting cold via ‘wicking’ Synthetic base layers don’t absorb water so they move moisture at a faster rate and (anti-‘fragrant’) Merino wool is better at providing insulation even when wet
  • Mid Layer: Traps air between itself and your base layer to provide a cozy buffer against the outside temperature. Your jersey is typically synthetic but may contain small traces of natural fibers. It is designed to wick moisture away from your body, working as an extension of your base layer. Choose one or even two mid layers depending on the outside temperature.
  • Outer Layer: These come in ‘windproof’ and ‘waterproof’ or both to keep large drops of water from penetrating to your inner layers. Check that the word ‘waterproof’ is in the description. We prefer Soft shell lightweight, breathable, windproof, waterproof jacket, with or without sleeves that allows wicking, with venting and/or removable sleeves to help maintain a comfortable body temperature during a ride but – must have a long tail.

Arm and leg warmers: Choose arm warmers that are not too heavily fleeced. If the temperature is over 60º you can avoid knee/leg warmers but for anything under 60º your joints will appreciate the added protection of lycra or even fleece-lined knee warmers – especially in the rain. Windproof tights (waterproof front and stretch material back sold in ski stores for downhill racing) on really wet and/or cold days are excellent especially if they have an elastic band that goes under your shoes.

Shoes and socks: Use neoprene booties high enough past your ankles and tuck them under windproof tights so that rain water running down your legs does not pour into your shoes. We have yet to find a good solution for wet socks and shoes. Neoprene booties, vinyl aero shoe covers, regular shoe covers, plastic bags and rubber bands all fail at some point. On the upside, just like a scuba suit, the water next to your skin gets trapped and warms up – so your shoes just feel ‘heavy’ so check under the shoe to ensure the vent is open to drain water.

Glasses: Wear clear or yellow lensed glasses treated with anti-fog such as Rain-X just before your ride

Keeping the rain out of your face: Simple – wear a cycling cap forward facing under your helmet to shield rain and road spray from hitting your glasses. Check that your helmet is on properly i.e. not sitting on the back of your head – protecting your forehead.

Gloves: ‘Cold Hands’ should be a primary concern on rainy days. Use ‘wind proof’ long fingered gloves e.g. Specialized’s BG Deflect Gloves, tucked under your rain jacket sleeves so that the cold rain water running down your arms is not sucked into the gloves. The deflective properties keep your wet hands warm. Like socks and shoes however you never seem to finish a rainy day ride with dry hands.

Fenders: Use them – Performance SKS X-Blade Fender and The SmartAss are not only for you but for the rider behind you – it is an unspoken rule that on rainy-day group rides you should never show up without fenders.

Chain Lube: On rainy days we suggest a heavier or rain specific chain lube/wax. Don’t expect it to last longer than about 2-3 hours before the squeaking starts.

Lights: The heavier the rain the less chance motorists have of seeing you. The brighter, the flashier, and the better chance you have of staying safe – especially if you are not riding close to the curb line.

Rain Bike: You can set up your fenders, lights and even spd pedals on a dedicated winter bike.

Tires: Reduce pressure in your tires for better grip – but only by 10psi as pinch flats caused by riding over puddles or a lot more bumps is typical on a rainy day.

Rainbow Patches and Puddles: Oil on the road will rise to the top of puddles, especially when it starts to rain, making the road surface a giant oil slick. Avoid rainbow-edged patches and also avoid the center of each car lane where cars leave the majority of their spilled oils. Metal (manhole covers etc.) are always slick as are all of the paint for traffic markings. You never know how deep a puddle is so try to avoid them.

Braking, turning, and accelerating: Use less of the front and more of the rear brake in wet conditions – but use them both. Do not ‘brake and turn’ and do not ‘turn and accelerate’ i.e. choose only one at a time – brake or turn or accelerate. It takes more than one full revolution of your wheel for the brake pads to scrape the water off the rim before the brakes are effective so plan ahead to brake early. When riding in a group the inside of a corner is the usually the safest place to be as crashes slide toward the outside. Overlapping wheels is the most common rain day crash so continuously and lightly test your brakes to gauge the required stopping distance, without actually braking and causing panic behind you, and as always be aware and plan your escape routes. Wet road grit will erode your rubber brake pads very quickly so check your brake pads after each wet ride.

Cornering: A training rain day is NEVER the best time to start learning how to corner properly so use every opportunity you have, whether it is on group or training rides or setting aside specific cornering training days – even solo rainy day recovery rides, to learn how to corner properly.

There are 5 basic cornering SKILLS that you need;

  1. Keep the frame stiff – downward pressure on outside pedal
  2. Lower your center of gravity i.e. hands in the drops is better than hands on the hoods is better than hands on the tops.
  3. Choose good lines: Turn wide, turn late and then hit and hold apex
  4. Go in under control (use both front and rear brakes)
  5. Come out fast
  6. Always look ‘though’ all corners

And there are 3 basic cornering TECHNIQUES you should be familiar with;

  1. Leaning (Lean your body into the corner at the same angle as the bike)
  2. Steering (Bike is more upright and your body is leaning into the corner)
  3. Counter-Steering (Lean the bike but keep the body more upright)

Use only #2 ‘Steering’ in the rain. Go into the corners slowly, let the bike flow through the corner by following the widest most gradual corner line for road/traffic conditions and accelerate slowly.

Do not stop – for long: You will be slightly wet, from perspiration, and it is cold outside and your body will cool down and start to chill if you stop for long so get going quickly to keep body temperature up.

You can improve your wet-weather skills by setting aside skill training days on a mountain bike off-road especially if it is on loose dirt trails. This will help you to feel the necessity of ‘weight shifting’ that roadies are simply not used to e.g. during climbs on wet and slick roads your rear wheel will slip under you and you need to shift your weight back slightly or at least stay seated to stabilize the bike. You can also practice braking hard to a skidding stop on the mountain or road bike on loose gravel or even in the wet to learn how to control a sliding bike in the rain.

Clean your bike and dry your shoes: You and your bike are both already wet and dirty so clean your bike as soon as you arrive back home/at your destination. This post-ride rinse is crucial regardless of how miserable you are feeling. It does not have to be a thorough washing. Rinse all the road gunk off the wheels, brakes, tubes, drivetrain, etc. and drain any collected water in your frame (bottom bracket) by standing the bike on end oil/grease moving parts

Pro-secret: Stuff your shoes (and even wrap your saddle and bars) with dry newspaper – they will all be bone dry in a few hours.

Nutrition and Hydration: You will lose just as much, if not more, moisture from your body in the rain than a normal ride so drink and eat plenty early. AVOID as much as possible swallowing road water spray kicked up into your face – it is nasty and can make you sick.

So now you know everything that I do about wet weather riding – I take great satisfaction in the middle of a ride when I realize that I am comfortable, safe, warm and riding my bike RAIN OR SHINE.

Thanks to Dan Netzer (who trains in the rain/cold/sleet and snow for half of the year) for edit and excellent additions to this article.
 

This is the time of the year when you need to complete a few basic tasks to prepare for your season. The 1st thing to do is to prepare your race bag. Clean out your old food items from your race bag i.e. throw out those 1-year old power bars and smelly gloves. If you do not have a racing bag as yet choose an old sports bag, preferably with a wet liner pocket, and then fill it with the following essential items:

 Full set of riding clothing including Gloves, Sunglasses, Shorts, Shirt, and Socks. Expand this list as soon as you replace your old Helmet, and Shoes, etc. simply add them to your race bag as spares
 Full change of fresh clothing including Underwear, Shorts, Shirt, Socks, Shoes and Cap/Hat
 2 bottles of water and 2 bottles of sports drink (the kind that fit directly into your water bottle cage)
 2 recovery drinks (cans of product like ‘Boost’ are convenient), several fresh power gels and high carbohydrate content food bars (not protein bars)
 Small 1st aid pack including Sudafed, Ibuprofen, Aspirin, Band-Aid, Non-stick wound pads, Roll of paper tape, Triple anti-biotic gel, etc.
 Sunscreen, Lip balm, other toiletries
 Large towel (on race day add a small towel in a plastic bag with a bottle of water to wash down after events)
 Spare tire, tube, pump, patch kit, and a basic set of bicycle tools
 Several signed “Liability Release” forms, a pen and a box of safety pins
 Copy of your racing license, drivers license, other ID including emergency contact, spare car keys (AAA plastic key is flat), $10 cash and a blank check all in a single billfold holder to be carried in your racing pocket. Keep your race bag in your vehicle at all times.

Now that you have your race bag prepared we can focus on your “1st race of the season” check list:
2 days before the race: NOT NIGHT BEFORE! Prepare your bike for racing. Cleaned, lubricated and tires pumped to full racing pressure. If you shave your legs do this the same night. You will probably use the bike before the race but it will require only a quick wipe down to get back into racing shape.

Night before the race: Prepare for quick, on the road, breakfast. You are looking for high fiber nourishment (OJ with Oatmeal with no-fat milk & brown sugar/raisins or peanut butter & banana on whole wheat sandwich and coffee/tea if you like) to be eaten 3 hours before racing. Fill a food bag with your hydration fluids bottled ready to drink (1 for drinking on the road, 1 for each warm-up and 1 for each hour of racing) and nourishing snacks – do NOT rely on fast foods or snacks sold at the event, bring what you eat with you. Put out your racing address, directions and start times. Eat a healthy dinner & get at least 8 hours sleep. Finally: Place the following list up on your mirror – go over it before going to sleep.
 Objective: What do I want to accomplish in this race and what is the team objective? Do they fit?
 Vision: What psychological commitment do I have to make to achieve my objective?
Reinforce the Vision: This means think ONLY about actually achieving the goal
 Optimism: Look at my training and racing accomplishments to date – I will repeat my best effort.
 Physiological: Control stress. Physical and Psychological stresses are productive
 Relax: I will not get too serious. I will have fun and prepare myself to enjoy the experience.
 Safety: Racing is an inherently dangerous sport. I will not contribute to unsafe racing conditions

Race day: Arrive 1-hour before your event (pre-registered) or 2 hours before to allow for registration. Choose a shady or sheltered quiet area and set up your trainer. Register. Preview your race strategy with your team. Before starting your warm-up pin your race number onto your racing jersey. Warm-up in old clothing and plan to complete your warm-up 10 minutes before your start time, put on your race clothing, use the bathroom and then proceed to the line – you do not necessarily need to pre-ride the course. Race hard. Plan A is: “Stick to the planned strategy”. Plan B is: “Make Plan A work”. Immediately after the race, 10-minute cool-down, clean up and change out of your race clothing before ‘hanging out’. If you are on a podium put on your spare set of team clothing (from your race bag) and BE ON TIME for the presentation. That would be your opportunity to thank your sponsors. Once you are done – call your coach and let him know if you achieved your goal and what you couda, shouda and wouda like to have done differently.

1896861_947682635299784_7524368904560650110_n

Drinking safely on the move takes practice (that is why I include practicing the skill on the spin ride). When you decide to drink;
• Hands on the hoods
• You do not need to look down to take the bottle out
• Reach for the bottle and slide it out while looking forward
• Learn to grab the bottle and grip it in the same place so that you do not move your hand on the bottle (and risk dropping it)
• In your mouth tilt the bottle up (and squeeze). Do not tilt your head
• Take as much as you can in one squeeze. Anytime your hands are off the hoods you are in danger. To avoid having to reach for your bottle too many times do not ‘sip’ on your bottle – learn to take a really big swig i.e. you should empty a bottle in 3-5 reaches.
• Glance down to see where the bottle cage is, look up and put the bottle back
• The entire movement should take a few seconds